Deviation Actions


Description
Hey guys, some of you asked If I would sell my pattern, the answer is NO....but I post it for free, since it is not perfect and in Germany it is against copyright laws to sell pattern of figures, you did not imagined yourself.
So....here it is! My Elsa pattern, feel free to ask if you don't get my crazy intentions, maybe I will answer later, please be patient with me!
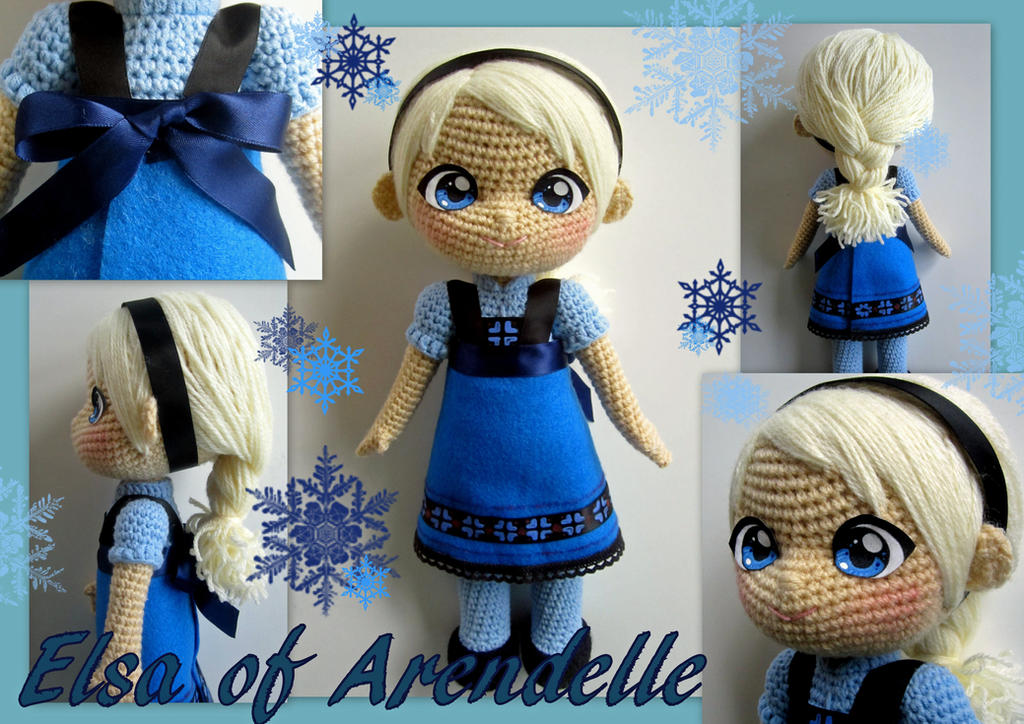
Elsa crochet toddler doll
You need:
3,5 mm hook, worsted weight yarn in bright blue and skin, bright yellow (vanilla) for hair, black for shoes
Tapestry needle for sewing
Black and dark blue ribbon
Some black lace
Acrylic paint (optional)
Water-based clear gloss varnish (optional)
Safety eyes (optional)
Hot glue gun or fabric/craft glue
Microfiber tissue for eyes or alternative (safety eyes, buttons)
Embroidery floss in light pink
Oil-free pastel chalks in red an pink for the cheeks
Soft brush
Legs: (in bright blue) crochet 2
R1: 6 sc in MR (6)
R2: increase every sc (12)
R3: increase every 2nd sc (18)
R4: increase every 3rd sc (24)
R5: sc (in back loops only) (24)
R6: sc (24)
R7: 8 sc, decrease 4 times, 8 sc (20)
R8: 6 sc, decrease 4 times, 8 sc (16)
R9-R18: sc (16)
(10 rounds total)
R19: increase every 8th sc (18)
R20: sc (18)
R21: increase every 9th sc (20)
R22+23: sc (20)
R24: increase every 10th sc (22)
R25+26: sc (22)
R27: increase every 11th sc (24)
R28-30: sc (24)
Crochet legs together with a slip stitch, go on from here with the body and head.
Legs, body and head are worked as 1 piece.
Tutorial for crocheting legs together:
Body and head:
R1: sc (46)
R2: increase every 23th sc (48)
R3-7: sc (48)
(5 rounds total)
R8: 14 sc, decrease (3 times) (45)
R9: sc (45)
R10: 13 sc, decrease (3 times) (42)
R11: 12 sc, decrease (3 times) (39)
R12: sc (39)
R13: 11 sc, decrease (3 times) (36)
R14-22: sc (36)
(9 rounds total)
R23: 10 sc, decrease (3 times) (33)
R24: sc (33)
R25: 9 sc, decrease (3 times) (30)
R26: 3 sc, decrease (6 times) (24)
Color change to skin
R27: decrease every sc (in back loops only)(12)
R28-30: sc (12)
(that's the neck)
R31: increase every 2nd sc (18)
R32: increase every 3rd sc (24)
R33: increase every 4th sc (30)
R34: increase every 5th sc (36)
R35: increase every 6th sc (42)
R36: increase every 7th sc (48)
R37: increase every 8th sc (54)
R38: increase every 9th sc (60)
R39: increase every 10th sc (66)
R40-46: sc (66)
(7 rounds total)
R47: decrease 4 times where you want to the nose of your doll (62)
R48: decrease 2 times above the 4 decreases from the round before (60)
R49-55: sc (60)
R56: 8 sc, decrease (6 times) (54)
R57: 7 sc, decrease (6 times) (48)
R58: 6 sc, decrease (6 times) (42)
R59: 5 sc, decrease (6 times) (36)
R60: 4 sc, decrease (6 times) (30)
R61: 3 sc, decrease (6 times) (24)
R62. 2 sc, decrease (6 times) (18)
R63: 1 sc, decrease (6 times) (12)
R64: decrease 6 times (6)
Fasten off
Weave in your ends
Stuff while you are working, gently secure the neck with toothpicks, pipe cleaners, or what works best for you
Head shape:
Needle sculpt the head like this:
Nose and eyes:
Embroider the nose and mouth, attach your eyes
I make my eyes with a micrifiber tissue: I paint the eyes with acrylics onto the tissue, secure them with a water based clear glosh varnish, cut them out and glue them to head as I like
Ears: make 2
R1: ch 6 (6)
R2: in 2nd ch from hook, 5 sc (5)
R3: decrease, 1 sc, decrease (3)
R4: decrease, slip stitch (one ear) (2)
and
slip stitch, decrease (other ear) (2)
Fasten off, leave long tail for sewing
Sew to the head befor you attach the hair
Cheeks:
Take a soft brush, rub some chalk off and attach this pastel chalk pouder to the dolls face
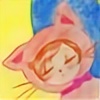
Hair:
Embroider Elsas bangs with your vanilla colored yarn, attach the rest to the top of the head, secure the sides of the hair with glue (hot glue works best for me), braid her hair in the back and attach a black satin ribbon as a headband
Collar:
Attach your brigth blue yarn to the extra loops of round 27 with a slip stitch to the middle of the chest
Make 1 sc, crochet with double crochets around the collar, make 1 sc, 1 slip stitch, leave one loop right in the middle of the chest unworked
Weave in your ends
Arms: (begin in brigth blue) make 2
Leave long tail for sewing, if your arm „grows“, bring your tail outside
R1: 6sc in MR (6)
R2: increase every sc (12)
R3: increase every 2nd sc (18)
R4-7: sc (18)
(4 rounds total)
R8: 1 sc, decrease (6 times) (12)
Color change to skin
R9: sc (in back loops only) (12)
R10: sc (12)
R11: decrease 1 time, sc (11)
R12-14: sc (11)
(3 rounds total)
R15: decrease 1 time, sc (10)
R16-22: sc (10)
from now on: hand
R23: increase every 3rd sc (3 times), 1sc (13)
R24: 1 sc, chain 2, crochet back, 1 sc in same loop like first sc, sc around
R25+26: Leave your thumb unworked, jump over this place, sc around for 2 rounds
R27: 1sc, decrease (around)
R28: flatten the hand and crochet your loops together,
fasten off and weave in ends
Alternative: Don't make a thumb, just work a simple hand after round 23
Stuff your hand only a little bit, so you can flatten it without problems
For the „sleeve“ look, attach your bright blue yarn to the extra loops of round 9 with a slip stitch, ch 2, double crochet around, join your round with a slip stitch, fasten off and weave in your ends.
Be careful to watch the direction of the thumb, it has to point into your direction if you attach the arms to the body.
Dress:
Attach black satin ribbons as the straps and bodice, decorate as you like (I glued mine to the upper torso, my bodice is painted with acrylics)
Cut out a skirt from middle blue felt, attach it over the ends of the straps, sew or glue black lace to the hem of your skirt, attach a black satin ribbon and decorate as you like (mine is painted as well)
Attach dark blue ribbon as the belt, glue an extra bow to the back where the ends of your belt meet
Draw 2 thin lines above and under the black ribbon on the skirt for decoration (you can use water color pencils for example
Shoes:
Work in black yarn, like the legs until round 8, fasten off and attach it with one stitch of sewing to your legs (in the back), weave in ends
Now you should be done! I would love to the your creations, post your links into the comments, please! ![]()
If you use this pattern, please give me credit and don't sell it as your own. I also don't want you to sell the finished doll.
Enjoy your very own Elsa! <3
Wow, that's cool! I crochet, but I've never made a doll or figure before.